Firebase Functions
# What is Firebase functions (opens new window) ?
Cloud Functions for Firebase let you automatically run backend code in response to events triggered by Firebase features and HTTPS requests. Your code is stored in Google's cloud and runs in a managed environment. There's no need to manage and scale your own servers.
Maybe also take a look at what is Cloud functions (opens new window), which is so well-known as serverless. It is similar to AWS lambda (opens new window) which more fit in google's cloud ecosystem, with feature pay per use. In some way, it is super cheap in terms of charge and maintenance if you put it in correct use.
In this article, we are going to look into few use cases to understand how firebase function could potentially work for us. It will mainly covers Directly callable functions && Trigger functions in Firebase ecosystem
# Setup firebase
$ npm install -g firebase-tools # install firebase tools
$ firebase login # login to firebase with your account
...
2
3
# init a firebase function project
# for now, I selectd Firestore & Functions, which will be used for next parts
# also, I'm doing it on an existing project, as I ve done the firebase project setup from the UI
$ firebase init

# generate file structure
$ tree
.
├── firebase.json
├── firestore.indexes.json
├── firestore.rules
└── functions
    ├── node_modules
    ├ ...
    ├── package-lock.json
    ├── package.json
    ├── src
    │   └── index.ts
    ├── tsconfig.json
    └── tslint.json

3 directories, 8 files
2
3
4
5
6
7
8
9
10
11
12
13
14
15
16
17
18
19
20
21
22
Since I choose to use typescript in this project, you can find all details here (opens new window) about typescript for firebase functions.
# How to deploy firebase functions and trigger them
# Directly callable functions
There are mainly three types
- Call functions from your app (opens new window)
- Call functions via HTTP requests (opens new window)
- Schedule functions (opens new window)
- Pretty much link corn job on top of google PubSub
I will more focus on HTTP request call, which we have an example below:
in the main file ./functions/src/index.ts
import * as functions from 'firebase-functions';

// Start writing Firebase Functions
// https://firebase.google.com/docs/functions/typescript

export const helloWorld = functions.https.onRequest((request, response) => {
  response.send('Hello from Firebase!');
});
2
3
4
5
6
7
8
the ./functions/package.json already have couple of scripts
...
  "scripts": {
    "lint": "tslint --project tsconfig.json",
    "build": "tsc",
    "serve": "npm run build && firebase serve --only functions",
    "shell": "npm run build && firebase functions:shell",
    "start": "npm run shell",
    "deploy": "firebase deploy --only functions",
    "logs": "firebase functions:log"
  },
...
2
3
4
5
6
7
8
9
10
11
we can simply deploy the function as:
$ yarn deploy
...
✔  functions[helloWorld(us-central1)]: Successful create operation.
Function URL (helloWorld): https://us-central1-marvin-firebase.cloudfunctions.net/helloWorld

✔  Deploy complete!

Project Console: https://console.firebase.google.com/project/marvin-firebase/overview
2
3
4
5
6
7
8
Hence the directly callable function helloWorld has been deploy to the cloud!
details can be found in https://console.firebase.google.com/project/marvin-firebase/overview, also, I could be able to try out:
$ curl -X GET https://us-central1-marvin-firebase.cloudfunctions.net/helloWorld
Hello from Firebase!%
2
🎉 the direct calling functions works!
# Trigger functions in Firebase ecosystem
Firebase ecosystem here I meant: Firestore, Database, Authentication, Analytics, Cloud Storage etc. You might want to check details here for all details (opens new window). In this section, I will cover Firebase Authentication triggers and Cloud Firestore triggers.
Hence, to make it clear, I've break down file ./functions/src/index.ts. And also created bunch of files for firebase triggers. You may find them below, under ./functions/src/:
$ tree
.
├── auth.ts
├── firestore.ts
├── index.ts
├── request.ts
└── types.ts
2
3
4
5
6
7
types.ts
export interface Claims {
  isAdmin: boolean;
  role: string;
}
2
3
4
index.ts
export { helloWorld } from './request';
export { userUpdated } from './firestore';
export { addDefaultUserRole } from './auth';
import * as admin from 'firebase-admin';
import * as functions from 'firebase-functions';

// Start writing Firebase Functions
// https://firebase.google.com/docs/functions/typescript

admin.initializeApp(functions.config().firebase);
2
3
4
5
6
7
8
9
10
request.ts
import * as functions from 'firebase-functions';

export const helloWorld = functions.https.onRequest((request, response) => {
  response.send('My first try on firebase for on request!');
});
2
3
4
5
I hope this file structure is easier to read, auth.ts and firestore.ts details will be listed below.
After this yarn deploy will deploy firebase functions to the cloud.
# Firebase Authentication triggers
auth.ts
import * as functions from 'firebase-functions';
import * as admin from 'firebase-admin';

export const addDefaultUserRole = functions.auth.user().onCreate(async user => {
  const uid = user.uid;

  //add custom claims
  return admin
    .auth()
    .setCustomUserClaims(uid, {
      isAdmin: true,
      role: 'admin'
    })
    .then(() => {
      return admin
        .firestore()
        .doc('users/' + user.uid)
        .set({ isAdmin: true });
    });
});
2
3
4
5
6
7
8
9
10
11
12
13
14
15
16
17
18
19
20
Basically, this function is executed when functions.auth.user().onCreate, which will then assign a custom user claim isAdmin and role to the user. Also, isAdmin will be stored in the firestore under path of users/{uid} for given structure.
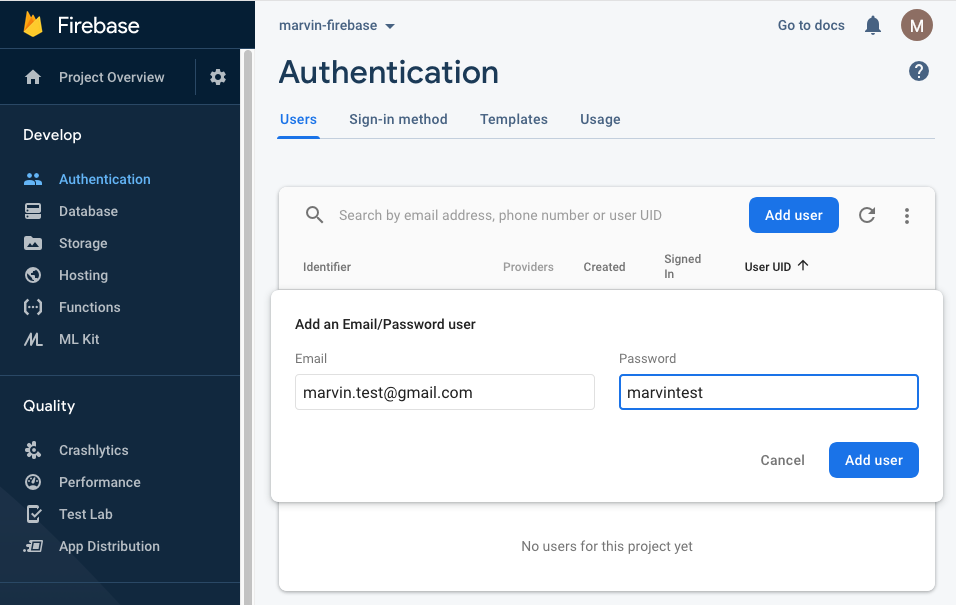
We can create a user as below
![Create user]()
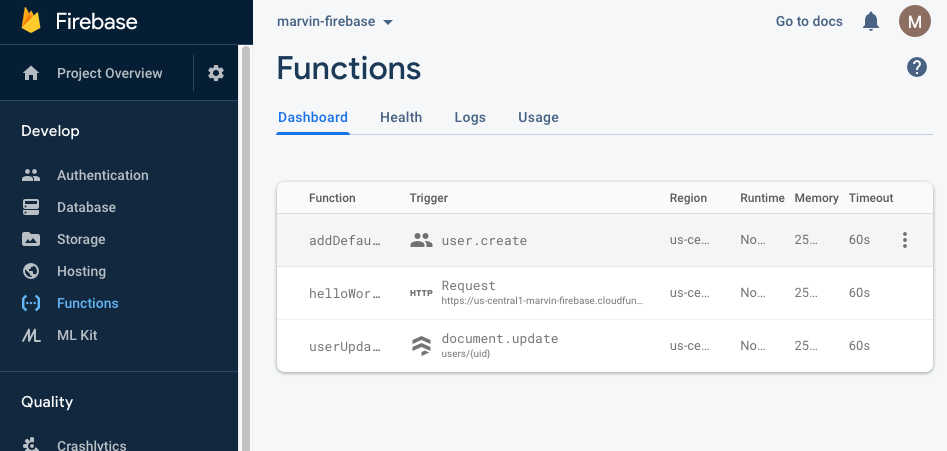
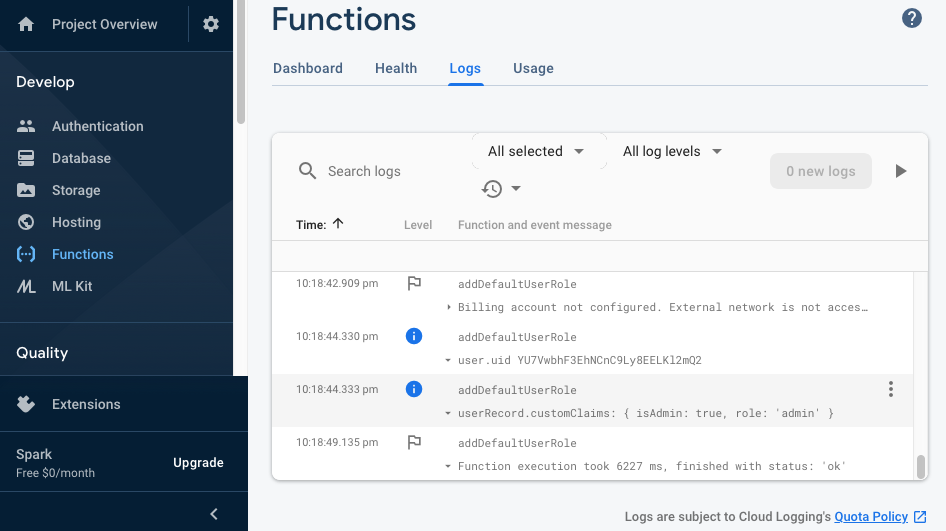
Then we can see function
addDefaultUserRolehas been executed properly from the log![User created log]()
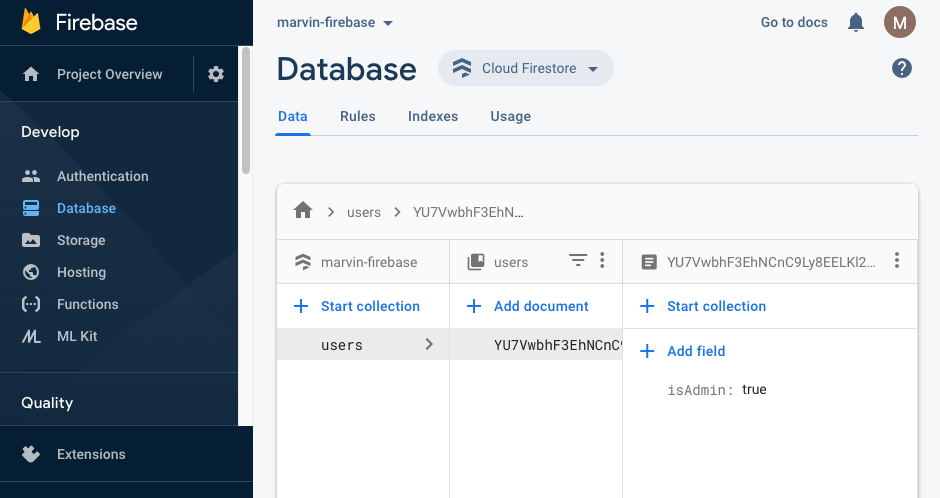
At the same time, database is also updated as expected.
![User data created]()
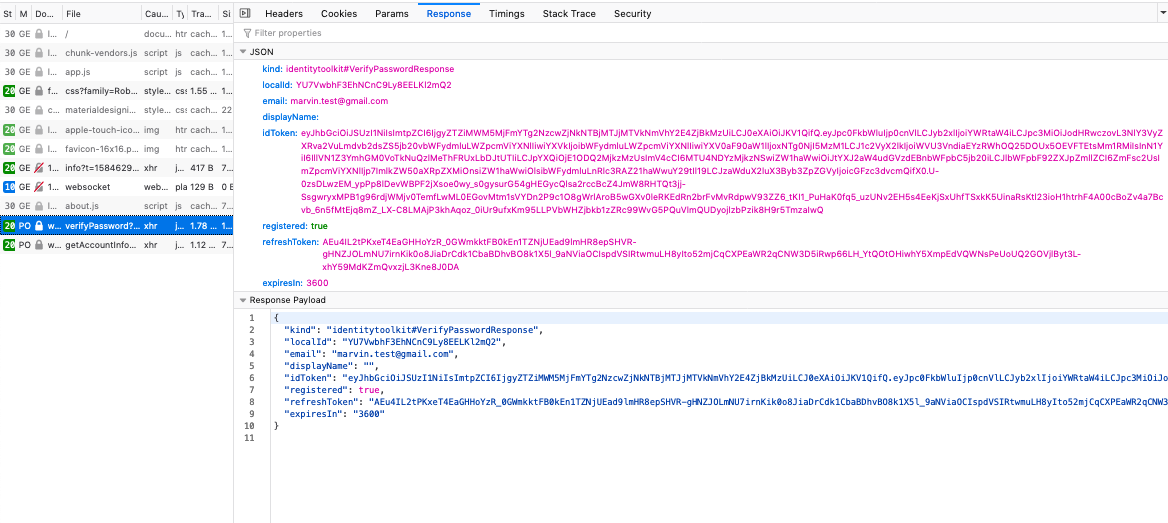
The claims should be in the token as well
I've build a simply frontend page for firebase auth, which I might share it as a blog in the future. Right now, we skip the details for it, only use it for checking the claims changed in the token.
Verify password:
curl 'https://www.googleapis.com/identitytoolkit/v3/relyingparty/verifyPassword?key=AIzaSyDXoTc8M3oTeoPnbveX2duU8KWcPDIeMEE' -H 'User-Agent: Mozilla/5.0 (Macintosh; Intel Mac OS X 10.14; rv:73.0) Gecko/20100101 Firefox/73.0' -H 'Accept: */*' -H 'Accept-Language: en-US,en;q=0.5' --compressed -H 'Content-Type: application/json' -H 'X-Client-Version: Firefox/JsCore/7.8.1/FirebaseCore-web' -H 'Origin: http://localhost:8080' -H 'Connection: keep-alive' -H 'Referer: http://localhost:8080/login' -H 'TE: Trailers' --data '{"email":"marvin.test@gmail.com","password":"marvintest","returnSecureToken":true}'
Get account info
$ curl 'https://www.googleapis.com/identitytoolkit/v3/relyingparty/getAccountInfo?key=AIzaSyDXoTc8M3oTeoPnbveX2duU8KWcPDIeMEE' -H 'User-Agent: Mozilla/5.0 (Macintosh; Intel Mac OS X 10.14; rv:73.0) Gecko/20100101 Firefox/73.0' -H 'Accept: */*' -H 'Accept-Language: en-US,en;q=0.5' --compressed -H 'Content-Type: application/json' -H 'X-Client-Version: Firefox/JsCore/7.8.1/FirebaseCore-web' -H 'Origin: http://localhost:8080' -H 'Connection: keep-alive' -H 'Referer: http://localhost:8080/login' -H 'TE: Trailers' --data '{"idToken":"eyJhbGciOiJSUzI1NiIsImtpZCI6IjgyZTZiMWM5MjFmYTg2NzcwZjNkNTBjMTJjMTVkNmVhY2E4ZjBkMzUiLCJ0eXAiOiJKV1QifQ.eyJpc0FkbWluIjp0cnVlLCJyb2xlIjoiYWRtaW4iLCJpc3MiOiJodHRwczovL3NlY3VyZXRva2VuLmdvb2dsZS5jb20vbWFydmluLWZpcmViYXNlIiwiYXVkIjoibWFydmluLWZpcmViYXNlIiwiYXV0aF90aW1lIjoxNTg0NjI5MzM1LCJ1c2VyX2lkIjoiWVU3VndiaEYzRWhOQ25DOUx5OEVFTEtsMm1RMiIsInN1YiI6IllVN1Z3YmhGM0VoTkNuQzlMeThFRUxLbDJtUTIiLCJpYXQiOjE1ODQ2MjkzMzUsImV4cCI6MTU4NDYzMjkzNSwiZW1haWwiOiJtYXJ2aW4udGVzdEBnbWFpbC5jb20iLCJlbWFpbF92ZXJpZmllZCI6ZmFsc2UsImZpcmViYXNlIjp7ImlkZW50aXRpZXMiOnsiZW1haWwiOlsibWFydmluLnRlc3RAZ21haWwuY29tIl19LCJzaWduX2luX3Byb3ZpZGVyIjoicGFzc3dvcmQifX0.U-0zsDLwzEM_ypPp8lDevWBPF2jXsoe0wy_s0gysurG54gHEGycQlsa2rccBcZ4JmW8RHTQt3jj-SsgwryxMPB1g96rdjWMjv0TemfLwML0EGovMtm1sVYDn2P9c1O8gWrlAroB5wGXv0leRKEdRn2brFvMvRdpwV93ZZ6_tKI1_PuHaK0fq5_uzUNv2EH5s4EeKjSxUhfTSxkK5UinaRsKtl23ioH1htrhF4A00cBoZv4a7Bcvb_6n5fMtEjq8mZ_LX-C8LMAjP3khAqoz_0iUr9ufxKm95LLPVbWHZjbkb1zZRc99WvG5PQuVlmQUDyojlzbPzik8H9r5TmzaIwQ"}'
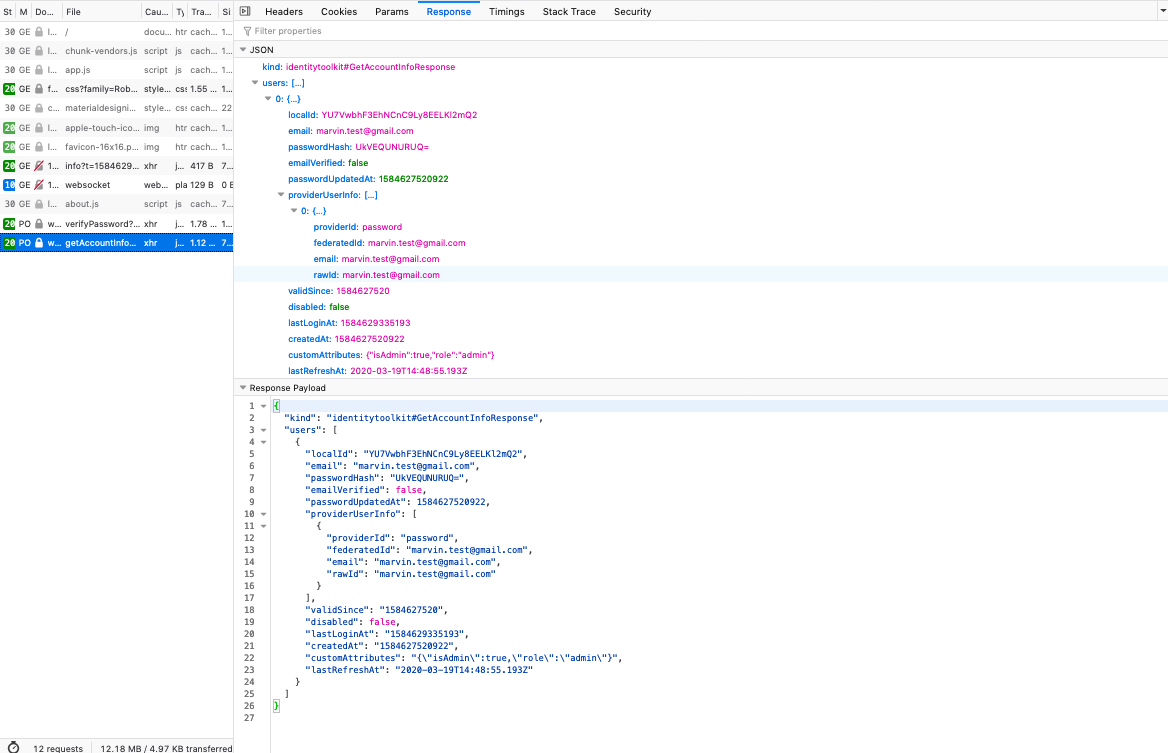
as you see, "customAttributes": "{\"isAdmin\":true,\"role\":\"admin\"}", indicate the custom claims properly!
# Cloud Firestore triggers
firestore.ts
import * as functions from 'firebase-functions';
import * as admin from 'firebase-admin';
import { Claims } from './types';

export const userUpdated = functions.firestore
  .document('/users/{uid}')
  .onUpdate((handler, context) => {
    const data = handler.after.data() as Claims;
    console.log('Data: ', data);
    return admin.auth().setCustomUserClaims(context.params.uid, {
      isAdmin: data.isAdmin,
      role: data.isAdmin ? 'admin' : 'non-admin'
    });
  });
2
3
4
5
6
7
8
9
10
11
12
13
14
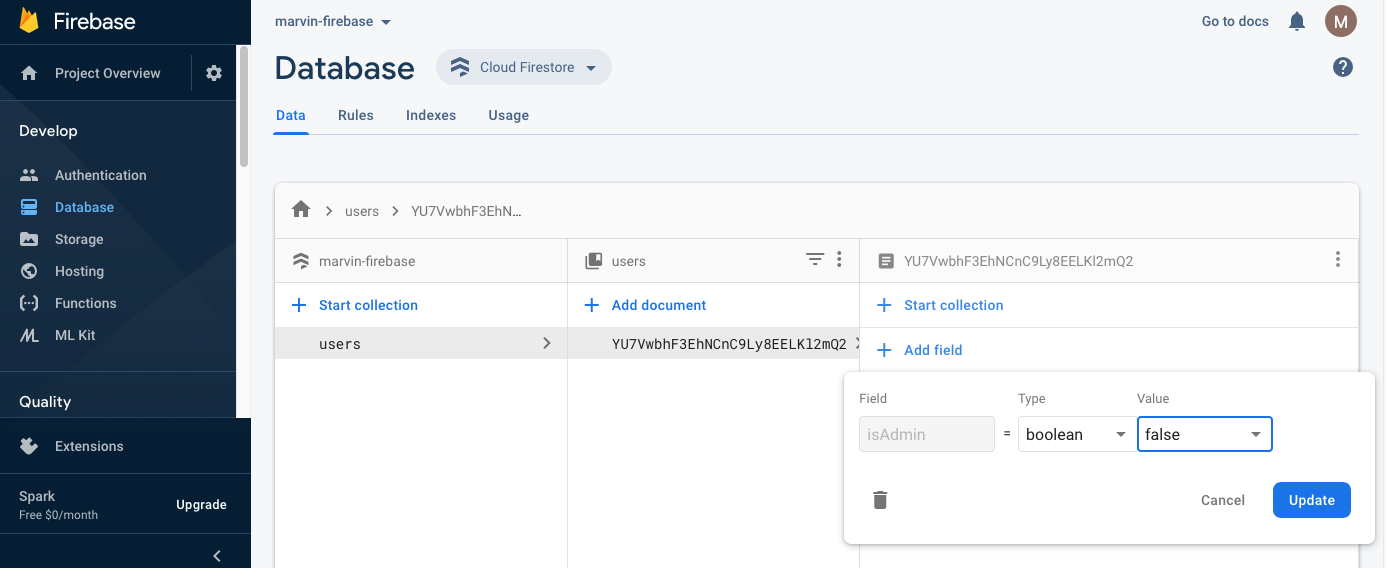
This function will be executed when functions.firestore.document('/users/{uid}').onUpdate, which will then based on the after change data value assign different value to the auth custom claim.
Get back to the data store, update the data as below:
![Update user data]()
Then we can found the function is triggered in the log:
![User data updated log]()
Again, we can check the customized claim is again, getting updated:
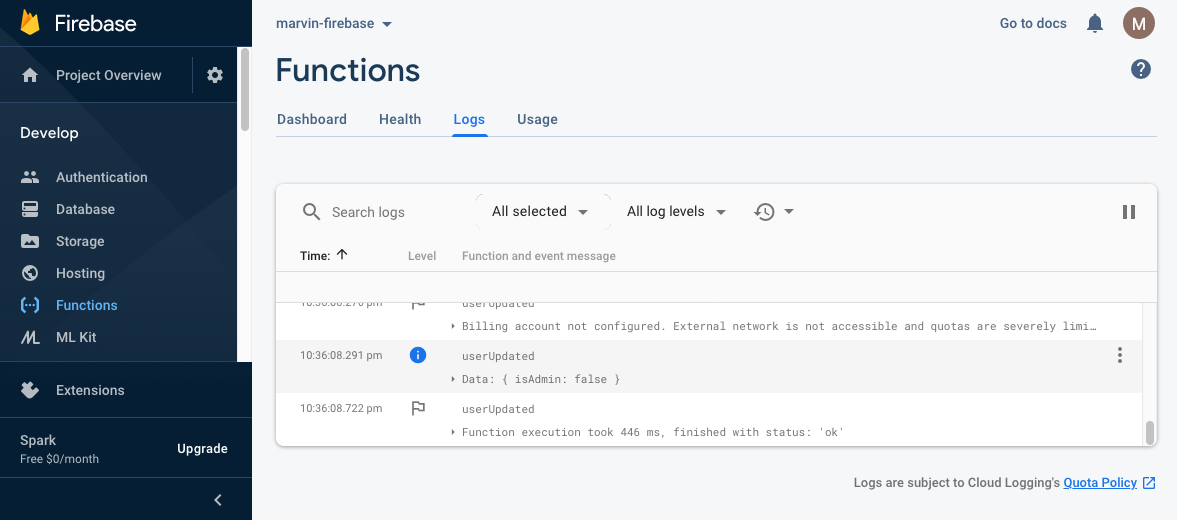
Here we do the same as above, we can see:
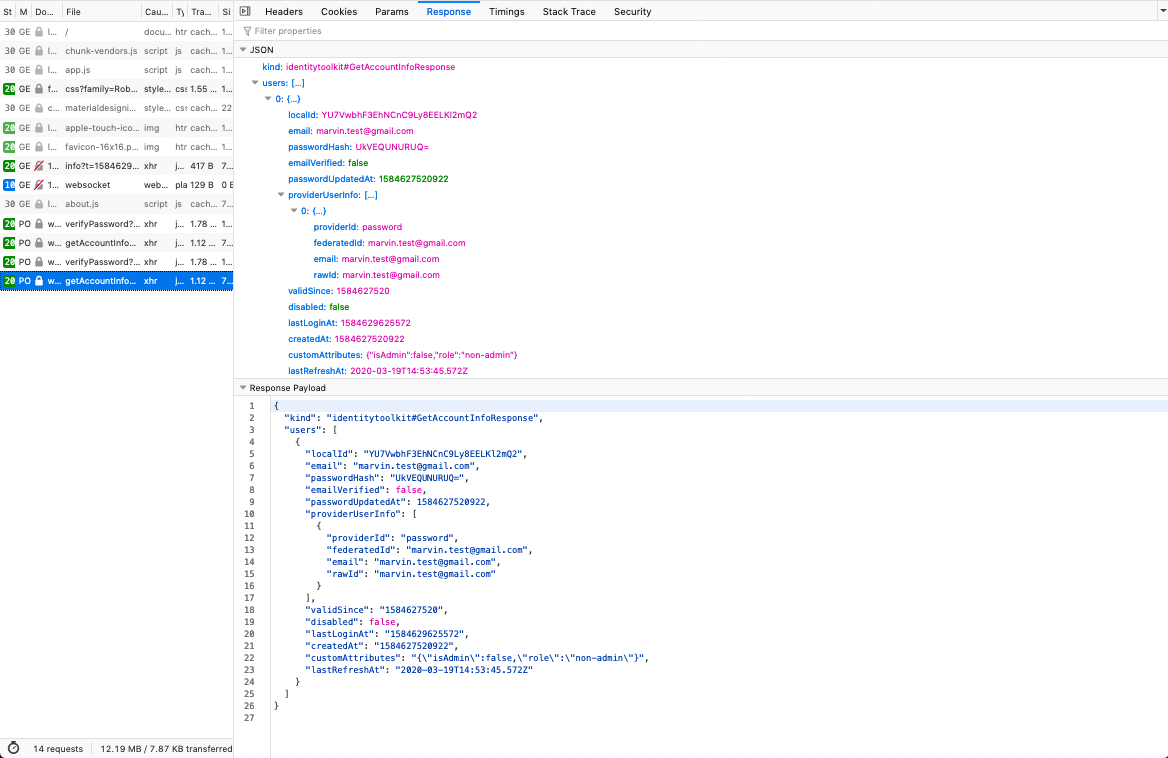
"customAttributes": "{\"isAdmin\":false,\"role\":\"non-admin\"}", indicates the change of data triggers firebase functions which then updated the custom claims of the token.
# Conclusion
As the examples shown above, firebase functions sit inside the firebase ecosystem, it can be triggered by simple HTTPs, firebase auth or simply an update of data in firestore. To some extend, you can take advantage of firebase to create a super convenient web / mobile application for your own purpose.
On their official website, there are other few sessions about:
- deploy and config firebase functions (opens new window)
- testing firebase functions (opens new window)
- monitor firebase functions (opens new window)
They all worth to dive into details to master firebase. If you have time, worth to take a look 🎉

